
Allways HyPe is in your extended network
TLDR: I love talking nerdy with people! ;)
PowerShell Summit: It’s Never Just About the Script
I went to PowerShell Summit expecting scripts and syntax. I left thinking about visibility, automation, and how real impact comes from making the work better — not just more technical. It’s never just about the tool. It’s about what we build with it, and who we build it for.
I just got back from PowerShell Summit, and while I expected to leave with a few new tricks up my sleeve, I didn’t expect to come home thinking so deeply about leadership, visibility, and what it actually means to create business value.
“Any improvement not at the constraint is an illusion.”
I went into the Entra ID and M365 as Code with DSC workshop with Raimund Andree and Gael Colas thinking I was going to learn how to keep my tenant clean using DSC and automation. I thought I was there for technical hygiene. A roadmap. Maybe a few Git tricks.
And of course, I learned plenty. They covered managing tenant configurations in source control, building out release pipelines, handling Dev/Test/Prod workflows, and treating your environment like a product. But what actually stuck with me wasn’t the tooling. It was the way they talked about why we do this.
Because here’s the thing — even if I’m committing changes to Git, if it’s not part of an automated pipeline, it’s still manual. I’m just lifting and shifting. I’ve moved the problem somewhere else without actually solving it.
It’s not enough for something to be versioned. If the process isn’t automated, self-documenting, and collaborative, it’s not bringing real value. The work might look cleaner, but the constraint is still there.
This isn’t about the technology. It never was. The tech helps us solve problems faster, more consistently, and with better visibility, but it’s not the solution. The value comes from building systems that scale, systems that make things better not just for me, but for my whole team.
After the session, I got to talk with Gael and Raimund. We talked about visibility. About how silos don’t just slow things down — they keep people out. And how the real work isn’t just making things function, it’s making sure everyone can see and contribute to that function. That’s what unlocks business value. That’s what scales. That’s what builds trust.
And honestly, what made it all stick wasn’t just the content. It was the people.
This community is built on folks who show up for each other. People like Lucas, who just dropped his own post that perfectly captured what it feels like to come back and realize you're still part of something. It reminded me that the best part of this space isn’t the sessions or the tech. It’s the shared commitment to doing better work, together.
There were so many conversations that kept echoing after I left. Late-night chats in the hotel lobby. Quiet moments between sessions where someone would casually drop a piece of wisdom that completely reframed how I thought about my own work. Everyone I talked to brought something different — a new tool, a smart workaround, a shift in mindset.
People were generous with their time. Open with their stories. And deeply invested in helping others grow. That doesn’t happen everywhere. But it happens here.
I walked away feeling like I had learned more from the humans in the room than from any single slide deck. Which honestly? Feels exactly right.
But what changed?
I stopped thinking about automation as something to do after the work is done. Automation is the work. If it's not automated, it doesn't scale. If it's not visible, it doesn't invite collaboration. And if it's not solving a real problem, it's just maintenance in disguise.
I left PowerShell Summit with more than technical ideas — I left with a clearer sense of what kind of engineer I want to be. One who builds for people. One who shares the work. One who leaves the system better than I found it.
┊˚➶ 。˚ ☁
Azure Arc and Azure Automation
Alright, let’s talk about something I’ve been messing around with for a while - Azure Arc and Azure Automation. This post kicks off a series where I’ll break down my journey of automating tasks with Azure Arc, what worked, what didn’t, and what I learned the hard way. If you’ve ever struggled with making automation work in a hybrid cloud setup, buckle up.
One of the reasons that I’ve been so excited and passionate about Azure Arc-enabling servers, whether they’re on-prem or in another cloud, is due to the numerous ways that the Azure platform functionality is unlocked without having to go all-in on Azure VMs. And honestly, that flexibility is a game-changer.
If you've ever talked to me, you know I’m all about iterating toward a goal instead of expecting a perfect setup from day one. My job constantly reminds me that the dream scenario isn’t always feasible immediately, so I focus on moving the needle forward, piece by piece. One of the big things that I've been focused on is creating a timeline for migration of various services to cloud-native. Recently, I had the opportunity to do just that.
There are numerous ways to update photos for your users, but what if you’ve got some somewhat unique constrains and are looking to disrupt the current workflow as little as possible before implementing a more mature and finalized solution? That’s what we’ll looking at doing today!
The fantastic blog post from SysManSquad: Using PowerShell and Graph to update Azure AD user photos in bulk got me started, but there were a couple of elements I tweaked to fit my use case.
What we’ll be covering:
Creating a Hybrid Worker group for our Azure Arc- enabled server
Building an Automation Account
Setting up a Managed Identity
Assigning permissions to the Managed Identity
Creating a Runbook in the Automation Account
Fixing some really annoying leaky data issues
Hybrid Workers: Why i love them ✩°。🎧 ✩°。⋆⸜
▄▀▄▀▄▀▄▀▄▀▄▀▄▀▄▀▄▀▄▀▄▀▄▀▄▀▄▀▄▀▄▀▄▀▄▀▄▀▄▀▄▀▄▀▄▀▄▀▄▀▄▀▄▀▄▀▄▀▄▀▄▀▄▀▄▀▄▀▄▀▄
One of the big reasons that I am such a fan of enrolling on-prem servers into Azure Arc is the ability to leverage Azure Automation Runbooks with the help of Hybrid Runbook Workers. Hybrid Workers allow the Runbook to run on the host server locally, giving the Azure Automation Runbook access to the resources that exist on the host. That means I can migrate scheduled tasks without moving everything to Azure all at once. It’s like a cheat code for modernization.
Managed Identities: BECAUSE secrets are the worst ✩ ♬₊.⋆☾⋆⁺₊✧✩♬
▄▀▄▀▄▀▄▀▄▀▄▀▄▀▄▀▄▀▄▀▄▀▄▀▄▀▄▀▄▀▄▀▄▀▄▀▄▀▄▀▄▀▄▀▄▀▄▀▄▀▄▀▄▀▄▀▄▀▄▀▄▀▄▀▄▀▄▀▄▀▄
I’ve been looking forward to working with Managed Identities for a while, and the addition of system-assigned managed identities in Azure Automation accounts was icing on the cake for me. No certs, no password rotation, and I can ditch managing service principal secrets. Just clean and simple authentication!
Azure Automation Setup
Initial setup ‧₊˚🖇️✩ ₊˚🎧⊹ ♡
▄▀▄▀▄▀▄▀▄▀▄▀▄▀▄▀▄▀▄▀▄▀▄▀▄▀▄▀▄▀▄▀▄▀▄▀▄▀▄▀▄▀▄▀▄▀▄▀▄▀▄▀▄▀▄▀▄▀▄▀▄▀▄▀▄▀▄▀▄▀▄
The simplest method to get started is to build everything with PowerShell. We’ll be creating a Resource Group, Automation Account and system assigned Managed Identity. If you already have a Resource Group that you’re using for your Azure Arc-enabled servers, go ahead and skip the creation of the Resource Group and use the one that you already have and create the Automation Account inside of it.
#create Resource Group, Automation Account, and System Managed Identity
Connect-AzAccount -Subscription 'Your Subscription Name'

#create Resource Group
$rgname = "rgAzureTesting"
$location = "westus2"
New-AzResourceGroup -Name $rgname -Location $location

#create Automation Account
$accountName = 'aaAzureTesting'
$rgName = 'rgAzureTesting'
$location = 'westus2'
New-AzAutomationAccount -Name $accountName -ResourceGroupName $rgName -Location $location

#create System Managed Identity
$accountName = 'aaAzureTesting'
$rgName = 'rgAzureTesting'
Set-AzAutomationAccount -Name $accountName -ResourceGroupName $rgName -AssignSystemIdentity
Next, we need to add the permissions to the Managed Identity
#Connect to Graph for assigning permissions
$TenantId = 'Your Tenant Id'
Connect-MgGraph -TenantId $TenantId

#Assign the Graph Permissions needed for updating user info
$GraphApp = Get-MgServicePrincipal -Filter "AppId eq '00000003-0000-0000-c000-000000000000'"
$ManagedIdentityApp = Get-MgServicePrincipal -Filter "displayName eq 'aaAzureAzureTesting'"
$Permissions = @(
    "Directory.Read.All",
    "User.ReadWrite.All",
    "ProfilePhoto.ReadWrite.All"
)

$AppRoles = $GraphApp.AppRoles | Where-Object `
{($_.Value -in $Permissions) -and ($_.AllowedMemberTypes -contains "Application")}

foreach ($AppRole in $AppRoles) {
    $AppRoleAssignment = @{
        "PrincipalId" = $ManagedIdentityApp.id
        "ResourceId" = $GraphApp.id
        "AppRoleId" = $AppRole.id
    }

    New-MgServicePrincipalAppRoleAssignment `
     -ServicePrincipalId $AppRoleAssignment.PrincipalId `
     -BodyParameter $AppRoleAssignment -verbose
}
Ditching PowerShell Modules for Invoke-RestMethod ✩ ♬₊.⋆☾⋆⁺₊✧✩♬
▄▀▄▀▄▀▄▀▄▀▄▀▄▀▄▀▄▀▄▀▄▀▄▀▄▀▄▀▄▀▄▀▄▀▄▀▄▀▄▀▄▀▄▀▄▀▄▀▄▀▄▀▄▀▄▀▄▀▄▀▄▀▄▀▄▀▄▀▄▀▄
One of my biggest frustrations? Constantly keeping PowerShell modules up to date. I finally said enough and switched to Invoke-RestMethod for direct Graph API calls. No more version mismatches, no more dependency headaches, just raw API calls.
I took a lot of inspiration from Sean’s Comparing Invoke-RestMethod to the PowerShell SDK blog post, which breaks down why REST API calls are often the better move.
More than just automating profile photos, this setup is a stepping stone for managing anything in Graph at scale.
Fixing My Mess: Leaky Data Issues
At one point, I realized my automation was pulling way more data than I actually needed. Turns out, since array lists have been my go-to for everything, I was using them instead of an ordered hash table. This caused my data filtering to be about as effective as a broken sieve.
Switching to an ordered hash table cleaned things up and gave me much better control over what was getting processed. Another lifesaver? Splatting. If you’re calling Invoke-RestMethod a lot, use splatting. It makes API calls cleaner, easier to read, and less prone to errors.
I learned a ton from this PowerShell tips article on handling Graph API calls properly.
I’ll be doing a deep dive on all of this in a future post because, wow, was this a frustrating lesson to learn.
Hybrid worker SETUP ✩ ♬₊.⋆☾⋆⁺₊✧✩♬
▄▀▄▀▄▀▄▀▄▀▄▀▄▀▄▀▄▀▄▀▄▀▄▀▄▀▄▀▄▀▄▀▄▀▄▀▄▀▄▀▄▀▄▀▄▀▄▀▄▀▄▀▄▀▄▀▄▀▄▀▄▀▄▀▄▀▄▀▄▀▄
Now, we’ll want to add the Hybrid Worker to Azure Automation account that we just created. Under the Process Automation blade, select Hybrid worker groups and Create hybrid worker group.


And now we’ll see the Hybrid Worker Group listed

Runbooks
Test the runbook ✩°。🎧 ✩°。⋆⸜
▄▀▄▀▄▀▄▀▄▀▄▀▄▀▄▀▄▀▄▀▄▀▄▀▄▀▄▀▄▀▄▀▄▀▄▀▄▀▄▀▄▀▄▀▄▀▄▀▄▀▄▀▄▀▄▀▄▀▄▀▄▀▄▀▄▀▄▀▄▀▄
Alright, so we did all of this setup so that we can run PowerShell scripts on the Azure Arc’d servers as if they were Azure VMs. Since these scripts are running on on-prem servers, we’re going to need to make sure that the script runs locally on the server.
When testing out a Runbook with a Managed Identity, running the script locally with the Managed Identity won’t work as a local run won’t have access to the Managed Identity resource. I’d recommend testing a script that won’t need those credentials and then move forward with using the Managed Identity in the Automation Account.
Start with a basic script that doesn’t require credentials.
Once that runs, integrate the Managed Identity.
Validate that it has the correct permissions before deploying at scale.
Pro Tip: If a Runbook works locally but not in Azure, it’s probably an authentication or permissions issue. Triple-check the Managed Identity’s role assignments.
Wrapping Up
Azure Arc + Hybrid Workers + Automation Accounts + Managed Identities = a ridiculously powerful automation setup.
If you want to check out the script I built for automating user photo updates, you can find it here.
This was just the first step. Stay tuned for the next post where I’ll break down leaky data fixes, structured API calls, and better debugging techniques.
If you’ve been doing something similar, hit me up! I’d love to hear how you’re automating things (and what pitfalls you’ve run into).
┊˚➶ 。˚ ☁
New Intune Lab
I've been procrastinating creating my own Intune lab for a few reasons but I figured it was about time to write up a few of the things that I'm doing to get myself up and running-ish, plus a great opportunity to highlight a sliver of the wonderful work other community members have provided.
Intune Tenant
▄▀▄▀▄▀▄▀▄▀▄▀▄▀▄▀▄▀▄▀▄▀▄▀▄▀▄▀▄▀▄▀▄▀▄▀▄▀▄▀▄▀▄▀▄▀▄▀▄▀▄▀▄▀▄▀▄▀▄▀▄▀▄▀▄▀▄▀▄▀▄▀▄▀▄▀
For my initial setup I had a few snags that definitely caused me to overcomplicate everything and I just wasn't happy with how everything looked. I decided to start fresh and snag myself the Microsoft 365 Business Premium license. I really wanted to start using Defender in my lab.
Settings
Initial configurations ✩°。🎧 ✩°。⋆⸜
▄▀▄▀▄▀▄▀▄▀▄▀▄▀▄▀▄▀▄▀▄▀▄▀▄▀▄▀▄▀▄▀▄▀▄▀▄▀▄▀▄▀▄▀▄▀▄▀▄▀▄▀▄▀▄▀▄▀▄▀▄▀▄▀▄▀▄▀▄▀▄
IntuneManagement
First step, I downloaded the IntuneManagement tool. The more that I use the IntuneMangement tool, the more that I fall in love with it. It’s hard to pick a favorite functionality, but the documentation and comparison feature are definitely up there for me.
OpenIntuneBaselines
From there I went to Jame's OpenIntuneBaselines and imported them into Intune using the IntuneManagement tool. I think that this took me a wopping 5 minutes, max. I have so many wonderful things to say about these baselines, but I’ll have to save that for another post.
Baselines - more than meets the eye
I would say that it’s pretty obvious that these baselines are timesaving and provide tremendous standardization, but there’s another element that they provide that really excites me.
I’d venture to guess that I’m not alone in that it seems as though there’s an endless pile of work and optimization that I see in my environment. Pairing IntuneManagement and OpenIntuneBaselines together is not only an opportunity for me to save time, but what about junior admins, or even service desk folks that really want to learn?
Now we’re got timesaving on expert mode!
An opportunity to learn JSON
Deepen experience with Graph Explorer
Continue to build automation
Documentation - this is huge for me. Being able to save time but also increase visibility and the habit (and culture) of documentation. Sign me up!
The markdown file > Confluence upload = chefs kiss, imo.
Applications ✩ ♬₊.⋆☾⋆⁺₊✧✩♬
▄▀▄▀▄▀▄▀▄▀▄▀▄▀▄▀▄▀▄▀▄▀▄▀▄▀▄▀▄▀▄▀▄▀▄▀▄▀▄▀▄▀▄▀▄▀▄▀▄▀▄▀▄▀▄▀▄▀▄▀▄▀▄▀▄▀▄▀▄▀▄
If you already have applications (or rather installers) easily get your packages rolling with the IntuneWin32App module. After you’ve gotten yourself setup, highly recommend getting your feet wet using Azure DevOps Pipelines and Intune App Factory.
Recommend checking out this update: Fix - Could not fetch access token for Azure
Devices ‧₊˚🖇️✩ ₊˚🎧⊹ ♡
▄▀▄▀▄▀▄▀▄▀▄▀▄▀▄▀▄▀▄▀▄▀▄▀▄▀▄▀▄▀▄▀▄▀▄▀▄▀▄▀▄▀▄▀▄▀▄▀▄▀▄▀▄▀▄▀▄▀▄▀▄▀▄▀▄▀▄▀▄▀▄
I wanted to get rolling right away with playing around with some of the Autopilot v2 features that I just haven't had a chance to use. Rather than building several VMs to enroll in Autopilot, I used Ben Reader's Intune.HV.Tools.
Fun item of note - Ben made is super easy, each device's serial number is auto added to the notes section of the VM in Hyper-V.
Closing Thoughts
Since Midwest Management Summit in May, I’ve been pondering the theme that consistently came up in conversation, and during QA portions of various sessions, of change and the people side of our day jobs.
While this post was focused on getting your lab up and running, I think it’s quite imperative to focus on solutions that can help bring others onboard with modernization. Modeling collaboration to those around you and giving them that head start in helping build a more secure, and scalable, management methodology is really going to be what will start moving the needle in getting any environment into a better state.
┊˚➶ 。˚ ☁
Bitlocker - Next Steps
In light of the massive Crowdstrike outage on the July 19th, I noticed significant chatter about Bitlocker and suggestions being thrown around to just export the keys in Excel or put them in a file in plain text.
My eye twitched a bit writing this next sentence…
I think it goes without saying, please do not do that.
Now, with a crisis on our hands, I absolutely understand the knee-jerk of just needing to get our users up and running as quickly as possible.
If you did export those keys, now what?
Rotate them!
Bitlocker Key Rotation
Why rotate your Bitlocker keys?
Quite a few reasons, but the biggest reason is that if your entire IT team was busy getting users up and running, and likely unprepared to handle the sheer scale of users needing Bitlocker keys, and/or IT teams were not aware of the self-service options available to users, this renders the integrity of those Bitlocker keys questionable, at best.
How to rotate? ‧₊˚🖇️✩ ₊˚🎧⊹ ♡
If you're in the camp of having already exported your BitLocker keys, Daniel Bradley’s blogpost How to Rotate BitLocker keys with Microsoft Graph PowerShell has one of the most straightforward methods to batch rotate all keys for devices that have their keys escrowed in Entra.
Dude, where are my Bitlocker keys?
What if you don't know if your devices Bitlocker keys are in Entra?
Nicholaj wrote a great post about this exact scenario back in 2021: Get Intune devices with missing BitLocker keys in Azure AD
Note: to utilize this method, you’ll want to update these lines of his PowerShell script:
Line 175:
$TokenExpireMins = ([datetime]$Headers["ExpiresOn"].ToUniversalTime() - $UTCDateTime).Minutes
Line 335:
$BitLockerRecoveryKeys = Invoke-MSGraphOperation -Get -APIVersion "v1.0" -Resource "informationprotection/bitlocker/recoveryKeys?`$select=id,createdDateTime,deviceId" -Headers $AuthenticationHeader -Verbose:$VerbosePreference
Rotation Options
▄▀▄▀▄▀▄▀▄▀▄▀▄▀▄▀▄▀▄▀▄▀▄▀▄▀▄▀▄▀▄▀▄▀▄▀▄▀▄▀▄▀▄▀▄▀▄▀▄▀▄▀▄▀▄▀▄▀▄▀▄▀▄▀▄▀▄▀▄▀▄
Schedule rotation! ‧₊˚🖇️✩ ₊˚🎧⊹
Rotate keys monthly? Don't mind if I do!
Steve's video How to automatically rotate your BitLocker recovery keys every 30 days covers Intune remediations and Azure Automation to rotate Bitlocker keys every 30 days.
Client-driven rotation ✩ ♬ ₊˚.✩
Oliver wrote a fantastic post Enable BitLocker Key Rotation for Intune managed devices going over all of the mechanisms at play during client-driven Bitlocker key rotation. Highly recommend reading!
Closing thoughts
Thank you to the fantastic community that stepped up!
Given all of the conversation that I’m seeing online about this massive outage, I can’t thank enough all of the IT teams that immediately jumped into action to get the world up and running again, and the members of the community that contributed deeply helpful solutions to sort out the various states of BitLocker compliance that many found themselves in.
┊˚➶ 。˚ ☁
Modern Server Management with Ansible
Modernize your server management with Ansible!
Talking about Azure Arc and Azure Update Manager at Midwest Management Summit, and during user-group sessions, I quickly saw areas of opportunity. The consistent comments that I heard from people, whether online or in-person, were along the lines of: this is really cool but how do I manage my servers, and 3rd party apps in Azure without ConfigMgr? These questions got me thinking, for those of us that are trying to get started on our cloud-native journey, there's very real management tasks and concerns that need to be addressed in order to make the leap.
Barriers
▄▀▄▀▄▀▄▀▄▀▄▀▄▀▄▀▄▀▄▀▄▀▄▀▄▀▄▀▄▀▄▀▄▀▄▀▄▀▄▀▄▀▄▀▄▀▄▀▄▀▄▀▄▀▄▀▄▀▄▀▄▀▄▀▄▀▄▀▄▀▄▀▄▀▄▀
Before I move onto some solutions that I've been playing with, I want to address the elephant in the room, barriers to making the leap to cloud-native.
I asked on Twitter:
The general consensus:
Overwhelm - start where? There's so many cool things out there, but how do I make the business justification for what I'm about to do?
Skills gap - I've built all of these PowerShell scripts and I want to keep using them. I don't want to throw all of that time away and I don't really have time to learn something new.
Building out a new lab - in order to even get started I have to figure out how to even use this new tool, let alone build out an environment.
Fear - “What if it doesn't work, what if I oversell this solution and can’t deliver?” That’s very real and I can definitely relate to those concerns, more than once.
I'm a small team (or a team of just me) - the overwhelm of work, and feeling as through there’s zero bandwidth to try something new seems to be a universal experience. The sage advice heard from the many more experienced people before me, there will always be more than enough work. Carve out time to develop and automate otherwise you’ll never have the time.
Why Ansible?
What made Azure Arc appealing to me, the single pane of glass for managing server updates, utilizing skills I was already developing across Intune and the Azure stack, Ansible had the same appeal. My motivation is to alleviate some of my workload and work towards a set-and-forget-ish solution, giving me the breathing room needed to implement more cool things.
Ansible is an “is an open source IT automation engine that automates provisioning, configuration management, application deployment, orchestration, and many other IT processes. It is free.”
AGENTLESS.
Ansible is agentless. You’re actually getting closer to your cloud-native goal instead of adding more agents/complexity to your environment.
No need to re-write all of your PowerShell (or other language) scripts. You can easily run them in an Ansible playbook leveraging the orchestration abilities of Ansible and super charging your scripts with the ability to dynamically run on hosts given specified parameters discovered by Ansible (in an easy-to-read format).
I'll start this off with saying, this blog post is just meant to get you started. I recommend playing around with these steps in a lab environment. There are additional enterprise implementations (and much better security), but we'll get to those in a later post, for right now, we're going to get going and just dive in.
Getting started with Ansible I had zero experience with Linux and started learning July 1st. Nothing quite like a deadline to kick ya into gear.... ;)
Windows Subsystem for Linux (WSL) ✩°。🎧 ✩°。⋆⸜
▄▀▄▀▄▀▄▀▄▀▄▀▄▀▄▀▄▀▄▀▄▀▄▀▄▀▄▀▄▀▄▀▄▀▄▀▄▀▄▀▄▀▄▀▄▀▄▀▄▀▄▀▄▀▄▀▄▀▄▀▄▀▄▀▄▀▄▀▄▀▄
Let's get started with WSL. Install WSL wherever you prefer, I'd recommend a VM that way you can always tear it down and start over. If you are using a VM built in Hyper-V, you'll want to enable nested virtualization, the easiest method is with PowerShell:
Set-VMProcesssor -VMName <VMName> -ExposeVirtualizationExtensions $true
I followed the Microsoft docs: Set up a WSL development environment
WSL Configuration ✩ ♬₊.⋆☾⋆⁺₊✧✩♬
▄▀▄▀▄▀▄▀▄▀▄▀▄▀▄▀▄▀▄▀▄▀▄▀▄▀▄▀▄▀▄▀▄▀▄▀▄▀▄▀▄▀▄▀▄▀▄▀▄▀▄▀▄▀▄▀▄▀▄▀▄▀▄▀▄▀▄▀▄▀▄
After setting up WSL, install Git and configure the following settings in your Git config file with your respective information:

Install pywinrm (the Python client for the WinRM service):

Installing Ansible…
To install Ansible, you’ll run the following command (I added black, flake8, ansible-lint, and pylint for formatting assistance).
pip3 install black flake8 ansible ansible-lint pylint
VS Code ‧₊˚🖇️✩ ₊˚🎧⊹ ♡
▄▀▄▀▄▀▄▀▄▀▄▀▄▀▄▀▄▀▄▀▄▀▄▀▄▀▄▀▄▀▄▀▄▀▄▀▄▀▄▀▄▀▄▀▄▀▄▀▄▀▄▀▄▀▄▀▄▀▄▀▄▀▄▀▄▀▄▀▄▀▄
I find the easiest method to using Ansible is with VS Code and opening into the WSL folder you’ll be working in (note, case sensitivity applies):


Ansible Terminology:
Declarative: Approaching a task by describing the end state instead of a description of the sequence of steps needed to accomplish that end state.
Example from Ansible’s documentation: A declarative specification of a task would be: “put me in California”. Depending on your current location, the sequence of steps to get you to California may vary, and if you are already in California, nothing at all needs to be done. Ansible’s Resources are declarative; it figures out the steps needed to achieve the final state. It also lets you know whether or not any steps needed to be taken to get to the final state
Facts: things that are discovered about remote nodes. Facts are inferred, rather than set.
Host: the remote machine that Ansible manages.
Inventories: group of hosts. This a device collection in ConfigMgr or device group in Intune. Inventories can be dynamic can be updated in real-time as you run playbooks and automation jobs.
Playbooks: the language Ansible uses to orchestrate, configure, administer, or deploy systems.
Plays: While a playbook is a list of plays, a play is simply the mapping between a set of hosts selected by a host specifier and the tasks which run on those hosts.
Roles: units of organization in Ansible implying implementation of a specific behavior. Roles apply certain variable values, and due to their associated file structure, roles allow the specification of shared behavior among playbooks.
Tags: allows the tagging of resources with keywords and then running only the parts of the playbook that correspond with those keywords.
Task: specified actions run against a host.
List: the JSON or YAML version of an array in PowerShell
Templates: Ansible can easily transfer files to remote systems but often it is desirable to substitute variables in other files. Variables may come from the inventory file, Host Vars, Group Vars, or Facts. Templates use the Jinja2 template engine and can also include logical constructs like loops and if statements.
Vars (Variables): As opposed to Facts, variables are names of values (they can be simple scalar values – integers, booleans, strings) or complex ones (dictionaries/hashes, lists) that can be used in templates and playbooks. They are declared things, not things that are inferred from the remote system’s current state or nature (which is what Facts are).
YAML: Ansible does not want to force people to write programming language code to automate infrastructure, so Ansible uses YAML to define playbook configuration languages and also variable files. YAML is nice because it has a minimum of syntax and is very clean and easy for people to skim.
Ansible WSL Gotchas ‧₊˚🖇️✩ ₊˚🎧⊹
▄▀▄▀▄▀▄▀▄▀▄▀▄▀▄▀▄▀▄▀▄▀▄▀▄▀▄▀▄▀▄▀▄▀▄▀▄▀▄▀▄▀▄▀▄▀▄▀▄▀▄▀▄▀▄▀▄▀▄▀▄▀▄▀▄▀▄▀▄▀▄
When I first started running Ansible, I kept running into permissions that I couldn’t quite solve. The permission issue that I had was how I found Jeremy Murrah’s Ansible for the Windows Admin (hyperlink is set to start where he’s talking about the permission issue) presentation to begin with (his GitHub). Jeremy references this blogpost by Craig Wilhite: Chmod/Chown WSL Improvements - Windows Command Line (microsoft.com).
I wouldn’t consider myself an expert on Linux permissions, but found this Reddit comment helpful.
If you’re like me and didn’t have any Linux experience, actually opening, editing, and saving various files was challenging at first given that it seemed like there was an assumption that this is common knowledge… If you choose to change the specific file based off of the Reddit comment above, you’ll want to run the following command in your Ubuntu terminal:
sudo nano /etc/wsl.conf
The nano command will open the actual file from the terminal. To save and close the file, the following keystrokes get the job done:
ctrl + o
enter
ctrl + x
Enrolling Servers into Ansible
Ansible communicates with Windows devices using WinRM.
For ease of enrollment, I setup my environment by running Ansible’s PowerShell script on the servers that I wanted to manage: ConfigureRemotingForAnsible.ps1
Once remoting is configured, set an admin account and password for Ansible to use.
Using Ansible on Hosts
I promise, the hardest part of making the jump to Ansible is setting up the Linux environment for Ansible to run in.;)
Ansible Playbooks ✩ ♬ ₊˚.✩
▄▀▄▀▄▀▄▀▄▀▄▀▄▀▄▀▄▀▄▀▄▀▄▀▄▀▄▀▄▀▄▀▄▀▄▀▄▀▄▀▄▀▄▀▄▀▄▀▄▀▄▀▄▀▄▀▄▀▄▀▄▀▄▀▄▀▄▀▄▀▄
I’ve setup my GitHub to get a folder structure going for you that you can walk through playing with Ansible.
Now we’ll get comfortable with the terminal. Using the file structure I just mentioned, we’re going to test the communication with my specified servers.
ansible -m win_ping windows -i group.vars/hosts --ask-pass
Order of operations:
ansible - telling the shell to use ansible
windows - telling the shell to call the windows hosts
-m win_ping - which ansible module to use
-i group.vars/hosts - calling inventory and where inventory lives
- - ask-pass - the password that Ansible will use for connecting to the host since we haven’t set up a vault. This is only a step if you don’t have the Ansible account password stored in a vault that is called during a play/playbook.

Key things to remember, Ansible has specific Windows modules that you’ll want to use when running tasks on Windows clients.
Azure Arc Enrollment
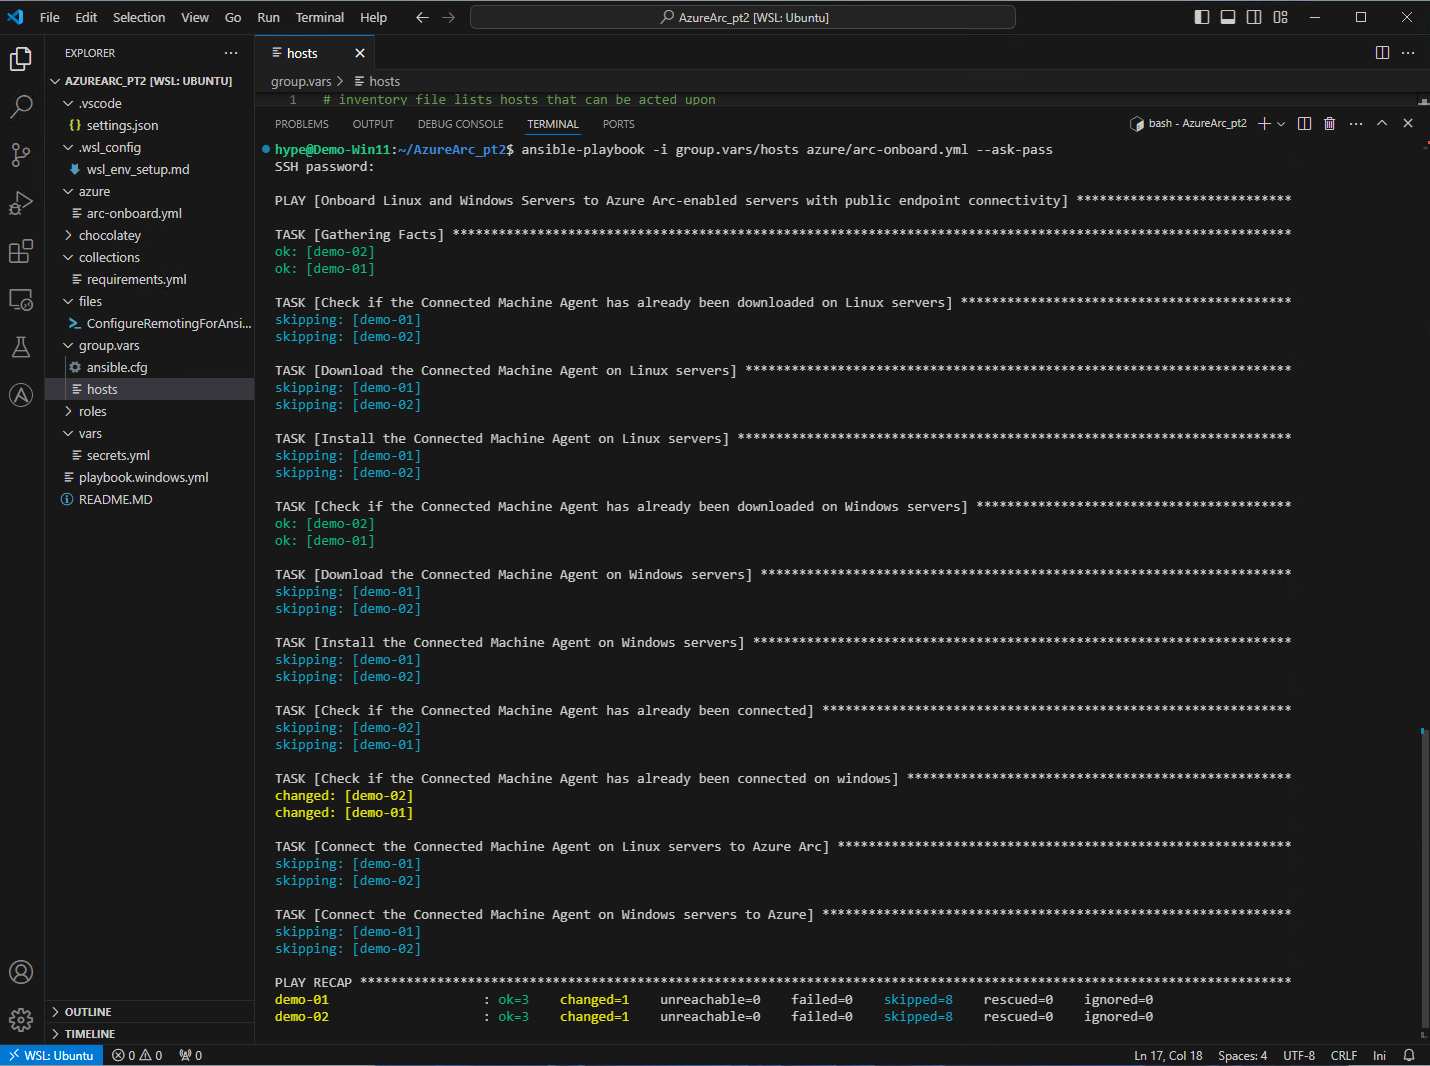
Following all of the steps from Azure Arc - Post Session, the only difference will be that for the Deployment Method we’ll instead us Ansible.
ansible-playbook -i group.var/hosts azure/arc-onboard.yml --ask-pass
Order of operations:
ansible-playbook - telling the shell that we’ll be using an ansible playbook
-i group.vars/hosts - calling inventory and where inventory lives
azure/arc-onboarding.yml - calling the playbook that we’ll be using
- - ask-pass - same as above
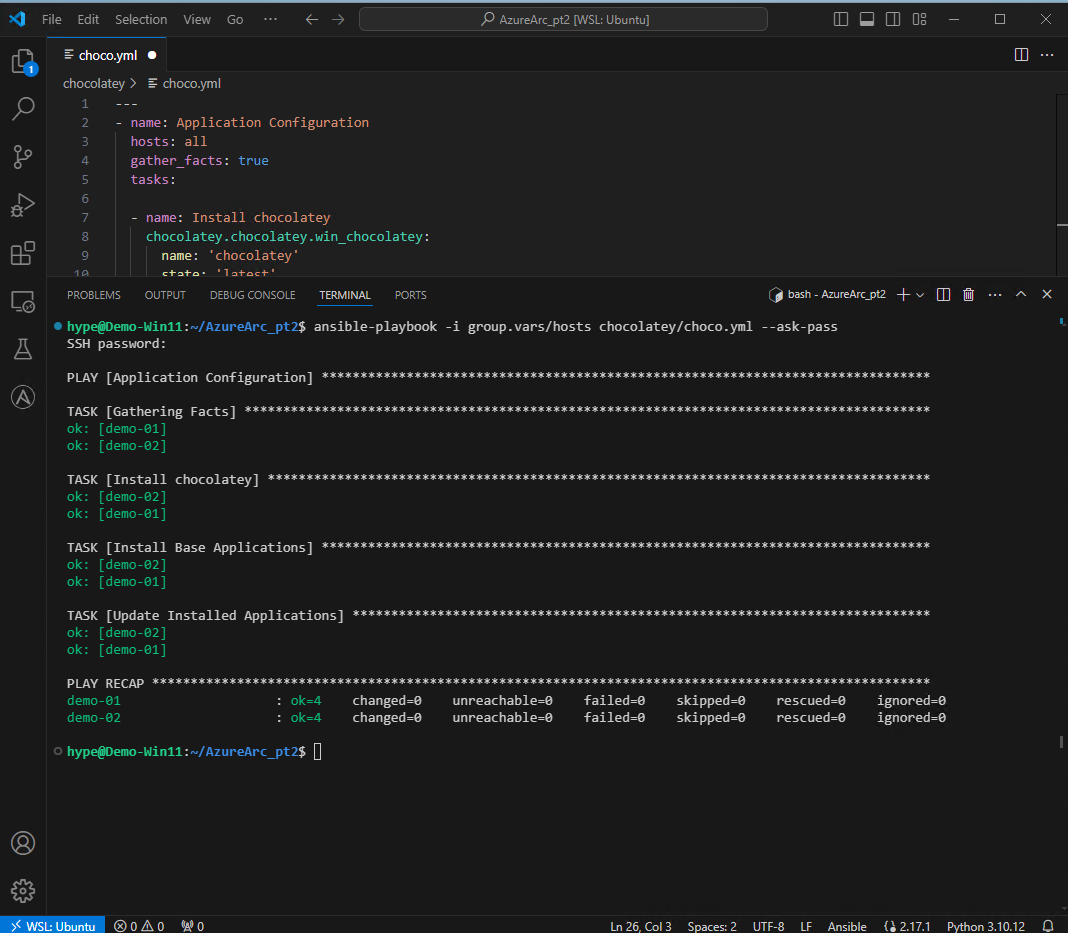
Chocolatey
I’ll be writing up another post to cover Chocolatey a bit more in-depth, but to get started I’ll be running a simple playbook to install a couple of applications from the Chocolatey repository.
ansible-playbook -i group.vars/hosts chocolatey/playbook.choco.yml --ask-pass
Order of operations:
ansible-playbook - telling the shell that we’ll be using an ansible playbook
-i group.vars/hosts - calling inventory and where inventory lives
chocolatey/choco.yml - calling the playbook that we’ll be using
- - ask-pass - same as above

But why change?
To reiterate, why use Ansible in my environment?
For me, just like why I chose to start using Azure Arc, I kept running into server management as the sticking point for jumping to fully cloud-native. Using Ansible, I’m now able to leverage desired state configuration, complimented by version control for easy peer review or rollback scenarios, on all of my Arc-enabled servers AND I can manage applications with Chocolatey. Rather than scrapping all of my PowerShell scripts, I can still use them by calling them from a playbook (I’ll be covering in a later post), and I’m using the same skills that I am in the rest of my cloud management skillset, just tacking on a bit more YAML than what I was using before.
Oh, and I had to learn some Linux and Python, but that’s been on my list for a long time.. so really, it was a win-win-win for me!
When I’m evaluating solutions, I’m always looking for solutions that save time and allow for dynamic, scalable, and cohesive management.
┊˚➶ 。˚ ☁
Resources:
Ansible packages:
Craig Wilhite - Chmod/Chown WSL Improvements
Jeremy Murrah’s PowerShell DevOps Global Summit presentation:
Josh King’s PowerShell DevOps Global Summit presentations:
Microsoft Docs:
Python packages:
Patch ‘em All?! Post Session
Your guide on patching 'em all with Azure Arc, blog edition!
If you attended the Midwest Management Summit session that I did with Adam Gross, then you likely have already seen everything I'm about to cover, but just in case this is your first exposure to Azure Arc, I can't wait for you to read on and hopefully take away some ideas on implementation in your own environment.
What is Azure Arc?
According to the official Microsoft docs, "Azure Arc simplifies governance and management by delivering a consistent multi-cloud and on-premises management platform." How that translates for me is that Azure Arc is the first step to reviving the first-class citizen status that your servers once had back in their glory days. Azure Arc creates an arc (see what I did there 😜) between where your resources currently live and Azure, allowing management of your resources in one unified location.
Why Azure Arc?
A consistent pain point that I've had since starting my Engineering journey and striving towards cloud-native has been, well what do I do with my servers? It always seemed as though managing my on-prem servers, or servers hosted in another cloud, was going to be tech debt that I wouldn't be able to address unless I rebuilt these servers in Azure.
In came Azure Arc to the rescue! Finally, a management method that gave the flexibility to address current management pain points while also extending Azure features (Log Analytics, Managed Identities, Defender for Cloud, etc) giving additional management capabilities, and a single pane of glass.
Enrollment
Enrollment. Truly, not anywhere near as scary as it seems. It really is as easy as the Microsoft Docs say that it is.
Enrollment Steps
1. Navigate to Azure Arc in the Azure Portal and from the drop-down select Add/Create and then Add a machine:

2. On the Add servers with Azure Arc page choose Add multiple servers (you’ll see why in just a moment) and select Generate script.
3. For the Project and server details, use what makes the most sense for your environment. For this blog post, I’ll be choosing all of the following:

4. Tags - adding custom tags is one of my favorite methods of managing servers with Azure Arc. I recommend adding tags that make sense to you and your environment. You can add tags later, but for this enrollment, you'll want to choose a grouping of servers that you plan to enroll and manage all together, for instance a dev patching group.
If you leave any of the tag values empty, those tags won’t populate.

5. Downloading the script. Choose a deployment method that works best for your environment. I personally would recommend Configuration Manager, or if you’re feeling fancy, Ansible.

6. Tada! The server that I enrolled is now in Azure Arc ready for me to manage, with the tags that I had configured during enrollment.


Azure Update Manager
Now that we have our server enrolled in Azure Arc, here’s where the fun begins.
One item of note that I do want to call out, when first opening Azure Update Manager, you’ll see your newly Arc-enabled server under the machines blade. That does not mean that the server is being patched with Azure Update Manager yet.
From the Machines blade, select your server, select Settings, and then Update Settings:

On the next page you’ll want to enable Periodic assessment so that the server can be assessed for patches.
Note: Patch orchestration is not application to Arc-enabled servers

I’m a bit impatient, so my next step is to select my newly enrolled server and click Check for updates from the machines blade of Azure Update Manager. Checking for updates will kick off an assessment on the server allowing me to do something with those updates, as well as installs the WindowsOsUpdateExtension. Fantastic, right? But who wants to sit around and wait for updates and manage them manually… I definitely don’t! Off to automating the installation of those updates.
Maintenance Configurations
An easy way to think about maintenance configurations, if you have a Configuration Manager background, is to think of them like maintenance windows in ConfigMgr.
Creating a Maintenance Config
From the same Azure Update Manager machines blade, select your newly enrolled server and click Schedule updates.
On the Basics tab input all of the details that align with what makes sense for your environment, and then for schedule, this is where you’ll configure all how often you’d like this schedule to run:

Dynamic Scopes is where the real magic starts to happen, in my opinion. After choosing the Filter by field you’ll have a list of filters to choose from…including… TAGS! Would you look at that? The custom tags (location tags would have also been available to use had I set them) from earlier now serve as a dynamic assignment option for this maintenance config.

For the Updates selection there’s the following options:
Include update classification
Include KB ID/package
Exclude KB ID/package
I’m going to make my update classification selection and continue on to Review + Create.

What about Server 2012 R2?
I thought you’d never ask… Enrolling Server 2012 R2 into Azure Arc is just as easy as enrolling newer server OS’. The one dependency is that Server 2012 R2 needs to be enrolled into Extended Security Updates (ESUs) per Microsoft’s Deliver Extended Security Updates for Windows Server 2012.
Installing Critical Updates
Automating update installation so that it can essentially be set and forget is definitely the ideal scenario, but as most of us can attest to, the ideal scenario is a lot less common than we’d like. What happens when you need to install 5 minutes ago? Not to fear! That’s where the one-time update comes into play.
Installing is very similar to steps from earlier, we’re going to choose One-time update from Azure Update Manager.
I do wish that the following pop-up didn’t make it seem as though clicking Install now was going to IMMEDIATELY install pending updates.

After clicking the Install now a much less intimidating page emerges, just like before, allowing you to choose the machines, update classifications, include by KB ID/package, exclude by KB ID/package, and include by maximum patch publish date.
Reporting
Where can you find the results of patching? From the Manage tab in Azure Update Manager select History. From there you’ll have the option to choose either By Machines or By maintenance run ID:

Clicking on the Open query in either the Total machines or Update deployment status boxes, Azure Resource Graph Explorer will open on the next page. I find this quite helpful as someone that has quite a bit to learn when it comes to KQL.

But why Azure Arc?
If you’ve made it this far, the real question is, why should I use Azure Arc? Sure it’s cool to be able to manage resources in Azure, but how will this impact my day to day?
For me, I kept finding that server management was what was stopping me from fully cloud-native. I continually kept coming back to on-prem management tools to manage my servers, especially when it came to updates. I needed a solution that was simple, created a single pane of glass for reporting, and got me one step closer to fully in the cloud. Azure Arc allowed me to manage servers hosted on various platforms and treat them all as though they were Azure native VMs. I finally was able to cut my time spent patching by a good 75%, managing double the amount of servers. That time savings alone allows me to now focus on modernizing the rest of my environment because I no longer have a complicated method of management, I now have a cohesive management methodology that will scale (thank you dynamic scoping!).
This is just the beginning of what can be done with Azure Arc! Keep your eyes peeled, I’ve been saving some of the automation that can be done for another blog post.
Resources:
The secrets to patching ‘em all?
I can give you a hint where to start looking -- follow my GitHub, AllwaysHype.
Follow me --> AllwaysHyPe GitHub
Wanna Patch ‘em All?!
Bring your Azure tenant Global Admin access and come have a beer with us while we walk you through patching 'em all with Azure Arc.
Bring your Azure tenant Global Admin access and come have a beer with us while we walk you through patching 'em all with Azure Arc.
Boss loved all of the great work you did last year and handed you a rouge cloud or on-prem environment to manage? Not to fear, we'll walk you through enrolling multi-cloud and on-prem servers, even those outdated 2012 R2 servers (that I'm sure that none of us have) into extended security updates. Walk away ready to patch 'em all in your environment with Azure Update Management Center.
MMS Session link: Patching Made Easy: Azure Arc & Update Management Center Unleashed
Disclaimer:
- in your Dev tenant, of course.
The secrets to patching ‘em all?
I can give you a hint where to start looking -- follow my GitHub, AllwaysHype. Be ready, we have some fun plans that will finally come to life during our session!
Follow me --> AllwaysHyPe GitHub
How it all started…
That sweet thrill of customizing my page’s HTML while trying to find the perfect cryptic song lyrics proving that it was “never a phase”.
Myspace.
That sweet thrill of customizing my page’s HTML while trying to find the perfect cryptic song lyrics proving that it was “never a phase”.
It wasn’t until I graduated from college and was in my first “big girl” job that I realized maybe I could do this IT thing.
Fast forward to finding myself in my first Engineering role a little less than a year later, and subsequently drowning trying to learn all things Microsoft Endpoint Configuration Manager and Intune — Community blogs and YouTube channels helped keep me afloat.
My goal for this blog is to give back to the wonderful community that helped me learn more than I thought was possible and provide real world solutions to everyday issues.
My IT "Top 8"
•
My IT "Top 8" •
My IT Toolbox
My current “Top 8” when it comes to IT resources…
…catch ‘em all! ;)